how to configure bsnl sip trunk in asterisk - freepbx - vicidial
In this article i have provided the steps to configure the BSNL SIP/Voip trunk in asterisk based PBX like Freepbx, Vicidial ,Goautodial etc. The configuration includes Asterisk sip.conf settings and Dialplan settings
Overview: BSNL SIP-VOIP PRI
BSNL SIP /VOIP trunk is an advanced voice connectivity solution via network, it replaces traditional multiple fixed PSTN with a single Physical line that support 1000 plus calls simultaneous calls.
Once you have purchased the BSNL SIP/VOIP connectivity , you will receive the below details from the BSNL support/sales team.
Also you have provided with OPENVPN details and requested you to configure the same in the PBX with below details
CA.crt
client.crt
client.key
BSNL bundled .vpn file.
Note: Openvpn installation and connectivity is not covered in this article, kindly refer google for Open vpn client installation and configuraiton
Network Connectivity: BSNL SIP
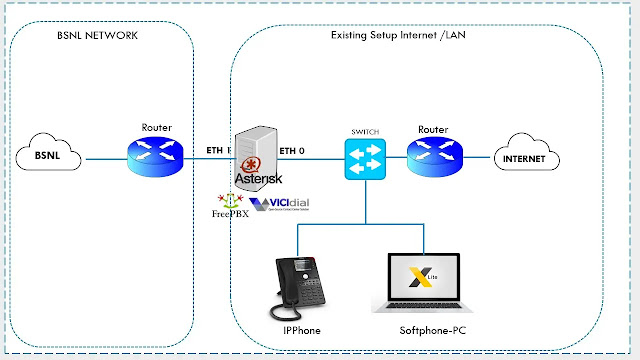
BSNL SIP trunk is provided to customer via dedicated SBC gateway and router, for which you need a additional ethernet port on your asterisk server or you need to setup your LAN in the same subnet range provide by BSNL. ref below Pic for better understanding
Steps to Configure BSNL SIP Trunk
Once the above connectivity is completed follow the below steps to configure the BSNL SIP Trunk in asterisk or vicidial or freepbx
STEP 1: Configure the BSNL network IP to eth1
Assign the IP provided by BSNL to one of the NIC in you server, for centos based server you may use below commands
IP address = 172.23.1.149
Subnet mask = 255.255.224.0
Gateway = 172.23.0.1
ifconfig eth1 172.23.1.149/19 gw 172.23.0.1
OR edit the ifcfg-eth1 file and manually enter the ip, OR if you have GUI manager configure manually.
STEP 2: Static Route to reach BSNL SIP SERVER /SBC IP.
vi /etc/sysconfig/network-scripts/route-eth1
10.191.5.1/32 via 172.23.0.110.191.5.8/32 via 172.23.0.1
Linux command to set a static route to SIP proxy ip and media ip
ip route add 10.191.5.1/32 via 172.23.0.1 dev eth1ip route add 10.191.5.8/32 via 172.23.0.1 dev eth1
Command to check the routes
ip route showorroute -n
Step 3: Add static DNS HOST entry
Edit hosts file and add the host entry
vi /etc/hosts
and the line which is in last line below.
# Do not remove the following line, or various programs# that require network functionality will fail.127.0.0.1 localhost.localdomain localhost::1 localhost6.localdomain6 localhost6127.0.0.1 go.goautodial.org go10.191.5.1 kl.stbi.ims.bsnl.in
Step 4: BSNL SIP Carrier settings.
register => +9144444XXXXX :PASSWORD:+9144444XXXXX @kl.stbi.ims.bsnl.in@kl.stbi.ims.bsnl.in/+9144444XXXXX
[bsnlsip]disallow=allallow=alltype=frienddtmfmode=rfc2833qualify=yesnat=force_rport,comediainsecure=invite,porthost=kl.stbi.ims.bsnl.inusername=+9144444XXXXX@kl.stbi.ims.bsnl.insecret=PASSWORDfromdomain=kl.stbi.ims.bsnl.indefaultexpirey=120canreinvite=nocontext=trunkinbound ; change this according to your inbound contextmaxexpiry=600progressinband=yes
STEP 5: BSNL SIP asterisk Dialplan
For Vicidial /goautodial use the below dialplan
exten => _9X.,1,AGI(agi://127.0.0.1:4577/call_log)exten => _9X.,n,SipAddHeader(P-Preferred-Identity: <sip:+9144444XXXXX@kl.stbi.ims.bsnl.in>)exten => _9X.,n,Progress()exten => _9X.,n,Dial(SIP/${EXTEN:1}@bsnlsip,,tTor)exten => _9X.,n,Hangup()
For Plain asterisk or freepbx
exten => _9X.,1,SipAddHeader(P-Preferred-Identity: <sip:+9144444XXXXX@kl.stbi.ims.bsnl.in>)exten => _9X.,n,Progress()exten => _9X.,n,Dial(SIP/${EXTEN:1}@bsnlsip,,tTor)exten => _9X.,n,Hangup()
Conclusion:
Hope this article is useful , for professional support reach me at skype or Telegram :striker24x7


